SDK setup for KMP apps
This guide shows the steps to set up the Kotzilla SDK in your KMP app.
Before starting, your application must be registered on the Kotzilla Platform:
- Using the Koin IDE Plugin inside Android Studio or IntelliJ IDEA, or
- Via the Kotzilla Console for a web-based onboarding experience.
Once your app is registered and the type is selected, follow the steps below to integrate the SDK, capture analytics, and start debugging and monitoring your app.
Step 1 - Setup Kotzilla SDK (KMP)
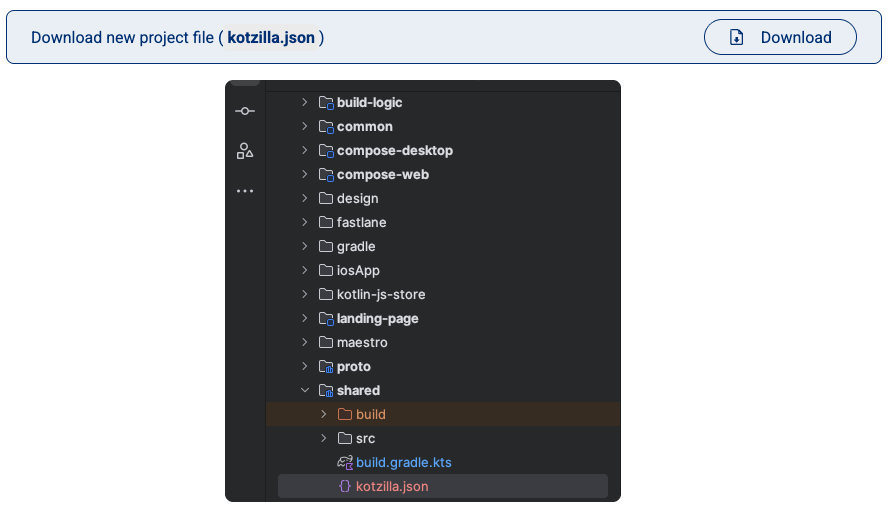
1.1 Kotzilla project configuration file
Download the kotzilla.json configuration file for your shared module and place it in the module directory:
Module (shared module) Gradle file: <project>/<shared-module>
This file contains your API key, version, and SDK configuration for shared code.
For KMP projects, open the downloaded kotzilla.json and add "isDefault": true to the key entry. See Using the isDefault property for details.
Apply the plugin and place kotzilla.json in the shared module only, not androidApp. iOS and other targets are instrumented through the shared module.
1.2 Set up the SDK
The instructions below use Version Catalog configuration by default.
If your project uses the legacy Gradle setup, please check the documentation here for specific instructions.
Kotzilla SDK is available on both Maven Central and the Kotzilla public repository. More information on how to configure access to the Kotzilla repository is available here
Add the following lines to your libs.versions.toml file:
[versions]
kotzilla = "2.3.1" // Check the latest version available below

[libraries]
kotzilla-sdk = { group = "io.kotzilla", name = "kotzilla-sdk", version.ref = "kotzilla" }

[plugins]
kotzilla = { id = "io.kotzilla.kotzilla-plugin", version.ref = "kotzilla" }
The latest version of the kotzilla-sdk is:

Set up the Kotzilla Plugin in your project root-level Gradle file (<project>/build.gradle.kts):
plugins {
    alias(libs.plugins.kotzilla) apply true
}
In your shared module Gradle file (<project>/<shared-module>/build.gradle.kts), add:
plugins {
    alias(libs.plugins.kotzilla)
}

kotzilla {
    versionName = "1.0.0" // Your app version
}
The SDK dependency is automatically added to commonMain. No manual implementation line needed.
If you prefer manual control: kotzilla { autoAddDependencies = false } then add:
commonMain.dependencies {
    implementation(libs.kotzilla.sdk)
}
The kotzilla {} block supports more options (composeInstrumentation, autoAddDependencies, uploadMappingFile, and others). See Kotzilla Gradle plugin configuration for the full reference.
1.3 Supported Platforms
The Kotzilla SDK supports these KMP targets:
| Platform | Target | Status | Notes |
|---|---|---|---|
| Android | androidTarget() | Stable | Full crash reporting with mapping file support |
| iOS | iosArm64(), iosX64(), iosSimulatorArm64() | Stable | dSYM setup required for crash symbolication |
| JVM | jvm() | Stable | Crash reporting works; no mapping file support yet |
For Compose Multiplatform (which adds JS/WASM browser targets), see CMP Setup.
1.4 Sync Gradle
Sync your project in Android Studio or IntelliJ IDEA to apply the changes.
Builds print the Kotzilla report for the selected app version. By default a FAIL status does not block the build (the report is informational). To turn it into a hard build gate, set kotzilla { skipBuildReportFailure = false }, or override it per build from CI/CD with -Pkotzilla.skipBuildReportFailure=false. See Kotzilla Gradle plugin configuration for details.
1.5 iOS Platform Support
The Kotzilla SDK supports iOS platforms in KMP projects.
iOS Build Configuration
Your shared module's build.gradle.kts should already include iOS targets:
kotlin {
    // iOS targets
    listOf(
        iosX64(),
        iosArm64(),
        iosSimulatorArm64()
    ).forEach { iosTarget ->
        iosTarget.binaries.framework {
            baseName = "SharedModule"  // Your shared module name
            isStatic = true
        }
    }

    // Other KMP targets
    androidTarget()
    // ... jvm, etc.
}
The Kotzilla SDK will automatically be included in your iOS framework when you build for iOS targets.
Xcode Integration
When integrating the shared KMP module into your Xcode project:
- The Kotzilla SDK is embedded in your shared framework
- No additional iOS-specific configuration is required
- Analytics data is automatically collected when the app runs on iOS
For framework generation, use Gradle tasks like:
Debug builds:
./gradlew linkDebugFrameworkIosSimulatorArm64
./gradlew linkDebugFrameworkIosArm64
./gradlew linkDebugFrameworkIosX64
Release builds:
./gradlew linkReleaseFrameworkIosSimulatorArm64
./gradlew linkReleaseFrameworkIosArm64
./gradlew linkReleaseFrameworkIosX64
1.6 iOS Crash Reporting
The SDK captures iOS crashes automatically using PLCrashReporter, including the full Kotlin stack trace. For readable crash reports, dSYM upload is required.
Without the correct dSYM file, iOS crash reports show only memory addresses — no function names, no file names, no line numbers.
One-Time Setup
Run this command to inject the dSYM upload script into your Xcode project:
./gradlew setupKotzillaXcode
Re-run after SDK updates to refresh the embedded script.
How It Works
- App crashes → crash data saved locally on device
- App relaunches → crash report uploaded to Kotzilla
- dSYM matched → readable stack traces appear in Console
Manual dSYM Upload
If automatic upload fails:
./gradlew uploadDsymFile
Version Consistency Warning
Each version can only have one dSYM file. If you rebuild the same version, the new dSYM overwrites the previous one, making older crashes unreadable.
Critical mistakes to avoid:
- Rebuilding a released version and uploading its dSYM (overwrites production dSYM)
- Using the same version for both debug and release builds
Always increment your version for each release build, including hotfixes.
Disable iOS Crash Reporting (Optional)
monitoring {
    onConfig { useIosCrashReport = false }
}
1.7 JVM Target Support
For JVM-only projects (Desktop apps, backend services), add the JVM target:
kotlin {
    jvm()  // Desktop/server target
    androidTarget()
    // ... other targets
}
The SDK captures crashes and analytics on JVM with no additional configuration.
Mapping file support is not yet available for JVM. If you use obfuscation (e.g., ProGuard), stack traces will show obfuscated names.
Step 2 - Start Kotzilla SDK (KMP)
Initialize the Kotzilla SDK in your shared module Koin configuration (Koin.kt in commonMain) to capture analytics for multiplatform targets:
import io.kotzilla.generated.monitoring

startKoin {
    // Your current Koin configuration
    ..
    // Add Kotzilla monitoring
    monitoring()
}
The monitoring() function is generated at build time by the Kotzilla Gradle plugin. It reads the API key and configuration from your kotzilla.json file automatically.
Call monitoring() last inside the startKoin { ... } block, after any modules(...) and includes(...) declarations, to avoid initialization issues.
Place startKoin { ... } in your shared code and call it once from each platform's entry point (Application.onCreate() on Android, AppDelegate on iOS), not from a composable.
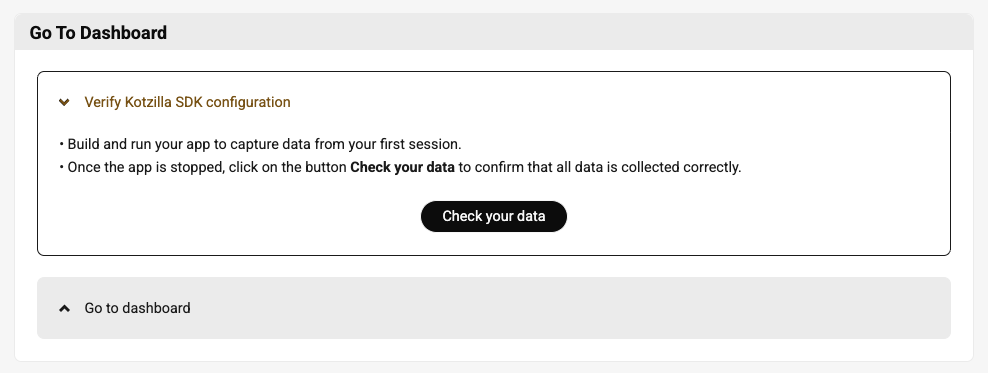
Step 3 - Go To Dashboard
Now that the SDK is configured, you can build and run your app to start capturing data from a first user session.
Once you've stopped the app:
- Click Check your data to confirm everything is being collected correctly.
- Then click Go to Dashboard to view your app’s performance and configuration insights.
Questions or issues during setup? Contact us. We are here to help!
Have you tried the Kotzilla MCP Server? It can guide your setup and analyze issues directly from your AI coding assistant.