SDK setup for SDK libraries
This guide shows the steps to set up the Kotzilla SDK in your Android SDK library.
Before starting, your application must be registered on the Kotzilla Platform:
- Using the Koin IDE Plugin inside Android Studio or IntelliJ IDEA, or
- Via the Kotzilla Console for a web-based onboarding experience.
Once your app is registered and the type is selected, follow the steps below to integrate the SDK, capture analytics, and start debugging and monitoring your app.
Step 1 - Setup Kotzilla SDK (SDK Library for Android)
1.1 Kotzilla project configuration file
Download the kotzilla.json configuration file for your library module and place it in the following directory:
Module (app module) Gradle file: <project>/<app-module>
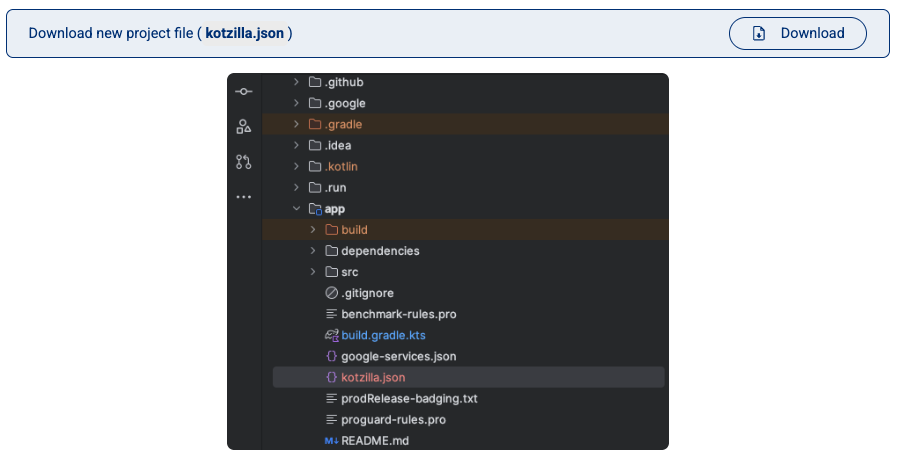
This file contains your API key, version, and SDK configuration for shared code.
1.2 Set up the SDK
The instructions below use Version Catalog configuration by default.
If your project uses the legacy Gradle setup, please check the documentation here for specific instructions.
Kotzilla SDK is available on both Maven Central and the Kotzilla public repository. More information on how to configure access to the Kotzilla repository is available here
Add the following lines to your libs.versions.toml file:
[versions]
kotzilla = "2.3.1" // Check the latest version available below

[libraries]
kotzilla-sdk = { group = "io.kotzilla", name = "kotzilla-sdk", version.ref = "kotzilla" }

[plugins]
kotzilla = { id = "io.kotzilla.kotzilla-plugin", version.ref = "kotzilla" }
The latest version of the kotzilla-sdk is:

Set up the Kotzilla Plugin in your project root-level Gradle file (<project>/build.gradle.kts):
plugins {
    alias(libs.plugins.kotzilla) apply true
}
In your app module Gradle file (<project>/<app-module>/build.gradle.kts), add:
plugins {
    alias(libs.plugins.kotzilla)
}
The SDK dependency is automatically added by the plugin. No manual implementation line needed.
If you prefer manual control: kotzilla { autoAddDependencies = false } then add implementation(libs.kotzilla.sdk)
The kotzilla {} block supports more options (autoAddDependencies, uploadMappingFile, versionName, and others). See Kotzilla Gradle plugin configuration for the full reference.
1.3 Sync Gradle
Sync your project in Android Studio or IntelliJ IDEA to apply the changes.
Builds print the Kotzilla report for the selected app version. By default a FAIL status does not block the build (the report is informational). To turn it into a hard build gate, set kotzilla { skipBuildReportFailure = false }, or override it per build from CI/CD with -Pkotzilla.skipBuildReportFailure=false. See Kotzilla Gradle plugin configuration for details.
Step 2 - Start Kotzilla SDK (SDK Library for Android)
Call monitoring() last in your SDK's isolated Koin context. The plugin supplies the key from kotzilla.json.
import io.kotzilla.generated.monitoring

koinApplication {                // or your existing KoinApplication
    androidContext(application)
    modules(...)
    monitoring()                 // last, after modules
}
Call monitoring() last inside the koinApplication { ... } block, after any modules(...) and includes(...) declarations, to avoid initialization issues.
Use koinApplication { ... } (not startKoin { ... }) so your SDK's Koin context stays isolated from the host app's. The monitoring() function is generated by the Kotzilla Gradle plugin and reads the API key from kotzilla.json automatically.
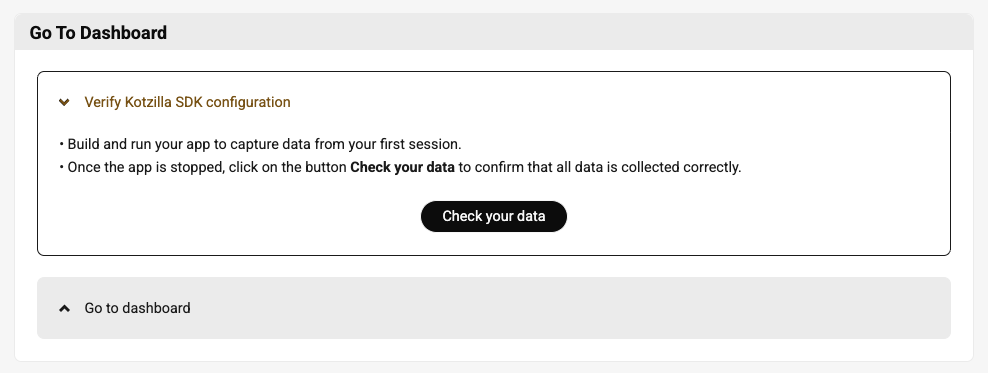
Step 3 - Go To Dashboard
Now that the SDK is configured, you can build and run your app to start capturing data from a first user session.
Once you've stopped the app:
- Click Check your data to confirm everything is being collected correctly.
- Then click Go to Dashboard to view your app’s performance and configuration insights.
Questions or issues during setup? Contact us. We are here to help!
Have you tried the Kotzilla MCP Server? It can guide your setup and analyze issues directly from your AI coding assistant.